 사전캠프 TIL 3일차 (안드로이드 확장 라이브러리 알아보기)
코드카타 나머지가 1이 되는 수 찾기 문제 정답class Solution { fun solution(n: Int): Int { for(i in 2..n){ if(n % i == 1) return i; } return 1; }}나머지가 1이 되도록 하는 가장 작은 자연수를 구해야하므로2 ~ n의 범위를 for문을 돌려 부터 시작 조건에 맞는 값을 반환하도록 한다. 전날에는 if문에도 중괄호를 씌웠는데 다른 언어와 마찬가지로if문의 중괄호에 들어가는 값이 1줄이라면 저런식으로 줄여서 쓸 수 있다. 컴파일러 조건 만족 return 1 은 이론적으로 도달할 수 없는 코드이지만모든 경로의 반환값을 요구하는 코틀린 컴파일러의 조건을 만족시키기 ..
 사전캠프 TIL 2일차 (안드로이드 아키텍쳐 알아보기)
코드카타 각도기 문제 정답class Solution { fun solution(angle: Int): Int { return when { angle 1 // 예각 angle == 90 -> 2 // 직각 angle 3 // 둔각 angle == 180 -> 4 // 평각 else -> -1 // 180도를 초과하는 경우는 정의되지 않음 } }}when 함수를 이용해 angle값에 따라문제조건에 맞는 숫자를 반환하도록 했다. when 함수when (변수) { case1 -> 동작1 case2 -> 동작2 else -> 동작3 }when..
 사전캠프 TIL 1일차 (안드로이드와 코틀린 알아보기)
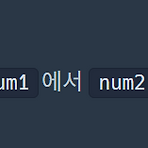
코드카타 두 수의 차 문제 정답class Solution { fun solution(num1: Int, num2: Int): Int { return num1 - num2 }}Solution클래스의 solution(num1: Int, num2: Int)함수는두 정수 num1과 num2를 매개변수로 받아 num1에서 num2를 빼는 연산을 수행하고 그 결과를 반환한다. 두수의 곱 문제 정답class Solution { fun solution(num1: Int, num2: Int): Int { return num1 * num2 }}두수의 곱을 반환하면 된다. 몫 구하기 문제 정답class Solution { fun solution(num1: In..
 [플러터] 홈 화면 그리기 & 다이얼로그 사용법
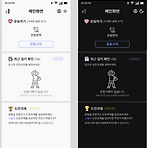
홈 화면 레이아웃 그리기 그릴 화면 일단 그려야 할 홈 화면의 레이아웃이다. 라우팅은 버튼을 통해서 이루어지며, 도전과제 클리어 여부, 운동기록의 여부에 따라 다른 화면을 출력할 것이다. 단색으로 이루어진 아이콘이 아닌 경우 라이트모드와 다크모드에서 출력할 svg파일 2개를 프로젝트에 추가해줘야 한다. common_outline_button.dartimport 'package:escape_anchovy/res/text/colors.dart';import 'package:flutter/material.dart';class CommonOutlineButton extends StatefulWidget { const CommonOutlineButton( {super.key, this.wid..
 [플러터] 이름 입력 페이지 구현 (싱글톤 패턴을 활용한 shared_preferences 사용법)
개요 이름 입력 페이지를 구현할 것이다. 이 페이지는 스플래쉬 화면에서 라우팅이 되는데이름입력을 한 상태라면 홈화면으로 라우팅이 되도록 할 것이다. Common 위젯 저 페이지를 구현하는데 3개의 Common위젯들이 필요하다.버튼, 텍스트필드, 유효성 검사 메시지 이렇게 3개 만들어주면 된다. common_button.dartclass CommonButton extends StatefulWidget { const CommonButton({ super.key, required this.text, this.width = double.maxFinite, this.height = 50, this.onPressed, this.textColor, this.backgrou..
 [플러터] 앱 테마 변경 기능 구현
앱바 레이아웃 구현 앱바 우측에 위치한 아이콘을 누르면테마가 변경되도록 구현할 것이다. 모든 화면에서 공통적으로 사용할 앱바를 하나 만들어주자 extension ThemeExtension on BuildContext { bool get isLight => Theme.of(this).brightness == Brightness.light;}colors.dart에 이걸 추가하면 'context.isLight'로 현재테마가 무슨 테마인지 감지할 수 있다. context.isLight는 현재 테마가 라이트테마이면 true를 반환하고그렇지 않다면 false를 반환한다. import 'package:escape_anchovy/res/text/styles.dart';import 'package:flutte..
 [플러터] 스플래쉬 화면 구현 (이미지에 애니메이션 주기)
파일 분리 void main() { runApp(const MyApp());}class MyApp extends StatelessWidget { const MyApp({super.key}); @override Widget build(BuildContext context) { return MaterialApp( title: 'Flutter Demo', theme: ThemeData( colorScheme: ColorScheme.fromSeed(seedColor: Colors.deepPurple), useMaterial3: true, ), home: const MyHomePage(title: 'Home'), ); }}// MyH..
 [플러터] 앱 기본 세팅 (VSCODE 사용)
프로젝트 생성 ! 먼저 플러터 개발환경 세팅을 완료해야 된다. vscode를 실행시킨 후 ctrl + shift + p > Flutter New Project > Aplication 누르고 프로젝트의 위치를 선택해준다.나같은 경우는 찾기 쉽도록 바탕화면으로 설정해줬다. 이렇게 생성한 프로젝트는 폴더형식의 파일이다. 프로젝트 이름(폴더명)을 지어주고 'Enter' 키를 누르면 이렇게 프로젝트가 생성된다.다시 프로젝트를 열 때는 파일 > 폴더열기 > 생성한 프로젝트 폴더 선택 순으로 하면 된다. 폴더구조 세팅 프로젝트를 생성하면 위와같은 기본 폴더구조가 보일텐데여기서 프로젝트에 필요한 폴더나 파일을 추가할 것이다. 아래 빈 곳을 클릭한 후 폴더 생성버튼을 눌러 'asset' 이라는 폴더를..